
Choosing hotel corridor wall lighting involves more than selecting attractive fixtures. Corridors guide guests, shape first impressions, and support safe movement at night. The right lighting should feel calm, consistent, and easy to maintain. It must also complement carpets, wall finishes, room doors, and architectural details.
This guide explains how to evaluate hotel corridor wall lighting through practical design criteria. We will consider brightness, glare control, color temperature, beam direction, fixture spacing, and energy performance. A wall sconce near a dark wood door may create warmth, while a narrow corridor may need softer, wider distribution. Light should reveal floor changes and signage without shining directly into guests’ eyes. Maintenance access also matters, especially in busy hotels with limited downtime.
Good choices depend on the building, not trends alone. Guestroom corridors, resort passageways, and boutique hotel halls require different visual approaches. Local safety requirements, accessibility guidance, emergency lighting provisions, and electrical rules should be checked with qualified professionals. Product specifications must be verified before installation. A beautiful fixture can still fail if its light output is excessive, its materials are difficult to clean, or replacement parts are unavailable.
Details matter.
Experienced designers often test sample fixtures at night. This reveals shadows, glare, and uneven spacing that drawings may hide. Still, judgment is imperfect. A lighting plan can look balanced on paper and feel cold in reality. Careful mock-ups, staff feedback, and measured adjustments can produce a more reliable result. This approach helps hotel owners create corridors that appear welcoming, operate efficiently, and remain comfortable for guests over many years.
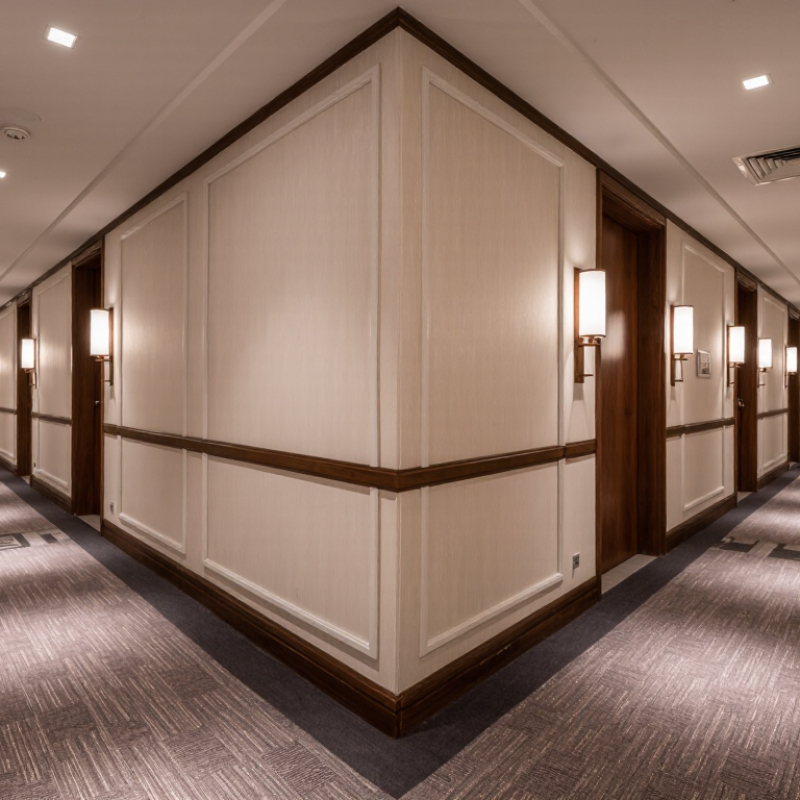
Hotel corridor lighting must begin with safety requirements, not decoration. During corridor audits, I check floor visibility, stair access, door numbers, and glare near guest eye level. EN 12464-1 specifies 100 lux maintained illuminance for hotel circulation areas. That figure is a useful baseline, not a complete design.
Safety comes first.
NFPA 101 requires means of egress illumination to provide at least 1 foot-candle average, with no less than 0.1 foot-candle at the floor. Emergency systems must also operate for at least 90 minutes during power loss. Local building codes may differ, so a qualified professional should verify the final design.
Wall-mounted fixtures should avoid sharp edges, exposed wiring, and shadows across exit routes. A 3000K to 3500K color temperature often supports comfort while keeping room numbers readable.
Energy performance also matters.
The International Energy Agency reports that lighting uses about 15% of global electricity. Efficient LED sources, occupancy sensors, and dimming controls can reduce unnecessary consumption. However, sensors can create uneven brightness when poorly positioned.
I have seen corridors become uncomfortable when fixtures respond too slowly. A lighting calculation should test spacing, reflected finishes, emergency coverage, and nighttime dimming. Standards help, but real corridors still need on-site observation.
How to Choose Hotel Corridor Wall Lighting?
Assess the corridor layout before selecting wall lighting. A straight hallway needs consistent visual rhythm, while an L-shaped route needs light near the turn. Place fixtures beside doors, lifts, and artwork, not only at equal intervals. The IES Lighting Handbook commonly supports about 100 lux for hotel circulation areas, depending on the task and interior finish. EN 12464-1:2021 also uses 100 lux for circulation areas. These figures are useful starting points, not universal answers.
Ceiling height changes the perceived brightness. In a 2.4-metre corridor, a compact wall fixture can spread light comfortably across the floor. With a 3.2-metre ceiling, the same fixture may create a weak lower zone and a harsh bright patch above. Select optics that wash the wall vertically, then verify spacing with photometric software. Keep glare away from seated guests and wheelchair users. A frosted diffuser may feel softer, but it can waste energy if poorly designed.
Guest circulation deserves practical observation. Walk the route at night, from the lift to a typical room, and check whether faces remain readable. The Illuminating Engineering Society recommends controlling glare through shielding, distribution, and appropriate brightness contrast. Avoid placing every fixture at eye level. It can make a narrow corridor feel crowded. A continuous lighting grid looks orderly, yet it may ignore luggage movement, housekeeping carts, and visual pauses. Real projects often reveal this mistake late. Review mock-ups before installation, because painted walls, dark carpet, and reflective doors can change the result significantly.
| Assessment Dimension | Typical Existing Condition | Recommended Lighting Response | Useful Planning Data | Design Rationale |
|---|---|---|---|---|
| Corridor Width | Narrow corridor: approximately 1.2–1.5 m; standard guestroom corridor: approximately 1.5–2.1 m; wide corridor: more than 2.1 m. | Use compact wall luminaires with controlled upward and downward distribution. In narrow corridors, keep the fixture profile shallow and avoid projecting into the circulation path. | Keep the luminaire projection within the local accessibility and fire-safety limits. A practical target is a projection of no more than 100–150 mm where the fixture is close to shoulder height. | A wide fixture or deep wall bracket can reduce the effective clear width and create a collision risk, particularly when guests carry luggage. |
| Clear Guest Circulation | Guest movement includes walking, luggage transport, housekeeping carts, and occasional two-way passing. | Locate wall lights outside the main walking line, preferably between doors or within architectural recesses. Avoid placing fixtures where doors open or carts turn. | Provide at least 915 mm of continuous accessible clear width where required by local regulations; many hotel corridors use approximately 1.5–1.8 m for more comfortable two-way circulation. | The legally required corridor width depends on the building code, occupancy, escape strategy, and accessibility regulations applicable to the project. |
| Ceiling Height | Low ceiling: below 2.6 m; medium ceiling: 2.6–3.0 m; high ceiling: above 3.0 m. | For low ceilings, use shielded wall lights with a stronger upward component only when reflected ceiling light is desired. For high ceilings, combine wall lighting with ceiling or indirect lighting so the upper wall and ceiling do not appear excessively dark. | Typical hotel corridor ceiling heights are approximately 2.4–3.0 m, subject to local construction and services requirements. | The higher the ceiling, the more important vertical illumination and beam distribution become; a small downward-only fixture may leave the upper visual field gloomy. |
| Mounting Height | Wall luminaires may be installed at low, mid-level, or eye-level positions depending on the design concept and fixture type. | Use a consistent mounting line and keep the bright source shielded from direct view. Avoid placing exposed lamps directly at typical eye level. | A common planning range is approximately 1.5–1.8 m above finished floor for decorative wall lights; confirm the final height against accessibility, impact protection, and maintenance requirements. | Consistent mounting improves visual rhythm and makes the corridor feel longer, calmer, and easier to navigate. |
| Illuminance on the Floor | Guest corridors generally require comfortable orientation lighting rather than task-level lighting. | Design for even, low-glare illumination along the walking route, with additional light at lifts, stairs, intersections, and changes in level. | A typical design target is approximately 100–200 lux maintained average illuminance on the floor, subject to the applicable lighting standard and hotel operating requirements. | Higher levels may be appropriate at decision points or where luggage handling and cleaning tasks are frequent. Avoid excessive contrast between corridor zones. |
| Vertical Illumination | Doors, room numbers, artwork, and directional signs are primarily viewed vertically. | Choose luminaires with a wall-washing or wide vertical distribution. Aim light toward door faces and signage without producing reflected glare. | Use a balanced vertical-to-horizontal lighting relationship; verify door-number readability from the approach direction rather than relying only on floor illuminance. | Guests identify rooms and routes from vertical surfaces, so a corridor can meet floor-level targets while still feeling visually dim if walls and doors are poorly lit. |
| Fixture Spacing | Spacing depends on luminaire output, beam angle, mounting height, wall reflectance, and the desired light pattern. | Use repeated fixtures for uniformity, or wider spacing with overlapping beams for a calmer decorative effect. Place the first fixture far enough from corners to avoid harsh bright spots. | As a preliminary study, test approximately 2.4–3.6 m spacing for compact wall luminaires, then confirm uniformity with photometric calculations or on-site mock-ups. | Spacing should be based on measured illuminance and uniformity, not on a fixed distance alone. Dark finishes generally require closer spacing or higher output. |
| Glare Control | Guests approach fixtures from both directions and may see the light source at different angles. | Prefer frosted diffusers, recessed sources, louvers, indirect light, or shielded optics. Position fixtures so the lamp is not visible from the main sightline. | Select a low-glare distribution and verify glare from standing, walking, and lift-waiting positions. The final glare limit should follow the selected lighting standard. | Glare is especially noticeable in quiet corridors because guests have long, uninterrupted sightlines toward repeated fixtures. |
| Colour Temperature | Hotel corridors are usually designed to feel warm, comfortable, and residential rather than clinical. | Use a consistent warm-white colour temperature throughout the corridor and coordinate it with room doors, flooring, artwork, and reception-area lighting. | Approximately 2700–3000 K is commonly used for hospitality corridors; select one colour temperature for the primary scheme to avoid visible colour shifts. | Warmer light can support a relaxed atmosphere, while slightly cooler light may improve perceived cleanliness in service or back-of-house areas. |
| Colour Rendering | Guests need to distinguish door finishes, artwork, flooring, and skin tones accurately. | Specify high-quality light sources with consistent colour rendering and tight colour consistency between fittings. | Use a colour-rendering index of at least CRI 80 for general areas; CRI 90 or higher is preferable where artwork, materials, or premium finishes are important. | High colour rendering helps materials look natural and supports a more premium perception of the corridor. |
| Wall and Ceiling Reflectance | Light walls and ceilings reflect more light; dark, textured, or heavily patterned finishes absorb or scatter more light. | Use indirect or wall-washing components for dark finishes, and reduce output or increase shielding where glossy surfaces create reflections. | For early calculations, common reflectance assumptions are approximately 70–80% for a light ceiling, 50–70% for light walls, and 20–40% for medium-to-dark finishes. | Actual reflectance varies by material, colour, texture, and ageing. Confirm assumptions with the interior-finish schedule. |
| Intersections and Decision Points | Guests slow down or change direction near lifts, stairs, corridor junctions, and amenity entrances. | Add visual emphasis with brighter vertical illumination, a change in wall-washing, or a distinct but coordinated fixture arrangement. | Use approximately 1.5 times the surrounding corridor illuminance as an initial design study, then check contrast, glare, and local code requirements. | Moderate emphasis helps guests read the building layout without making the corridor feel uneven or overly theatrical. |
| Lift Lobbies | Lift doors, call buttons, floor indicators, and signage need stronger visual recognition than a typical corridor section. | Use wall lights or vertical illumination to frame the lift lobby, while keeping reflections off lift doors and polished stone surfaces under control. | Consider approximately 150–300 lux for the lobby area as an initial range, with the final value determined by the lighting standard and the interior concept. | The lobby should read as a destination and transition point without creating a sharp brightness shock when guests leave the corridor. |
| Stairs and Changes in Level | Stairs, ramps, thresholds, and floor-level changes present higher trip and navigation risks. | Provide clear, uniform illumination on treads, risers, handrails, and landings. Avoid decorative fixtures that cast deep shadows across the walking surface. | Follow local life-safety and accessibility requirements; verify that tread edges and handrails remain clearly visible from the approach direction. | Decorative wall lighting must never replace the required emergency, escape-route, or stair lighting systems. |
| Emergency and Backup Lighting | Normal decorative lighting may fail during a power interruption or fire event. | Coordinate decorative wall fixtures with independent emergency lighting, exit signs, backup power, and the building fire strategy. | Emergency lighting levels, duration, spacing, and testing must comply with the local building, fire, and electrical regulations. | Emergency luminaires should remain identifiable and unobstructed even when decorative fixtures are dimmed or switched off. |
| Controls and Operating Schedule | Corridors operate continuously, but guest activity and housekeeping activity vary throughout the day. | Use dimming, time scheduling, occupancy detection where appropriate, or zoning by corridor section. Maintain safe minimum illumination at all times. | A common operating strategy is full output during peak arrival and departure periods, with reduced output during low-traffic hours where permitted by code and hotel policy. | Controls can reduce energy use, but sudden changes in brightness should be avoided in guest circulation areas. |
| Maintenance and Cleaning | Hotel corridors receive frequent traffic, luggage contact, cleaning, and occasional impact from service carts. | Choose sealed, cleanable, impact-resistant fittings with accessible drivers and replaceable components where practical. | Specify an appropriate ingress-protection and impact-resistance rating according to the location, cleaning method, and project requirements. | Easy maintenance reduces lamp outages and prevents mismatched colour or brightness between adjacent fixtures. |
| Planning note: The values above are preliminary hospitality-design ranges, not a substitute for a project-specific lighting calculation. Confirm corridor width, emergency provisions, illuminance, glare, accessibility, fire safety, electrical requirements, and energy limits against the regulations and standards applicable to the project location. | ||||
How to Choose Hotel Corridor Wall Lighting?
Hotel corridor lighting must support safe movement, visual comfort, and a consistent guest experience. During site inspections, I have found that attractive fixtures can still create harsh reflections on polished floors. Wall-mounted luminaires usually work well because they preserve ceiling space and guide attention along the corridor.
Choose lighting types according to the corridor’s structure and atmosphere. Upward and downward wall lights create soft layers, while shielded fixtures reduce direct glare near guestroom doors. Recessed wall lights suit minimalist interiors, but they may require more precise installation. Adjustable fixtures can highlight artwork or textured walls. Avoid glare.
Beam angle controls how light spreads across the wall and floor. A narrow beam can emphasize signs, artwork, or architectural details. However, it may create bright spots and dark gaps when fixtures are spaced poorly. A medium beam often provides a practical balance for long corridors. Wide beams produce smoother coverage, especially in low-ceiling spaces. Measure twice.
Color temperature also shapes perception. Warm white light around 2700K to 3000K can make wood, fabric, and warm finishes feel welcoming. Neutral white light near 3500K to 4000K can improve clarity in contemporary interiors. Extremely cool light may feel clinical and expose uneven wall finishes. Check samples at night, because daylight can disguise color differences. I once approved a warmer setting that looked elegant on paper but weakened wayfinding in practice. A small adjustment solved it, though the original decision needed reconsideration.
Typical beam angles and color temperatures for common hotel corridor lighting approaches.
Narrow beams create stronger visual accents, while wider beams provide more uniform wall coverage. Warm white light around 2700–3000 K is commonly selected for guest comfort and a welcoming atmosphere. Final specifications should be checked against corridor width, mounting height, wall finishes, glare control, and the project's lighting requirements.
How to Choose Hotel Corridor Wall Lighting?
Plan fixture spacing around the corridor’s visual rhythm, not only its ceiling dimensions. IES RP-9-23 recommends evaluating hospitality lighting through comfort, visibility, and atmosphere. In practice, wall fixtures often work well at 2.4–3.6-meter intervals, depending on lumen output, corridor width, and surface reflectance. Test one section first. Dark door recesses can reveal weak spacing decisions quickly. A useful mounting starting point is 1.8–2.1 meters above the finished floor. This keeps light near eye level while reducing direct glare for walking guests. The final height should follow the fixture’s photometry, ceiling height, accessibility needs, and local requirements.
Emergency illumination needs a separate calculation. NFPA 101, 2024 edition, specifies emergency lighting for at least 90 minutes after normal power loss. It also identifies an initial average of 1 foot-candle, with no point below 0.1 foot-candle, and a maximum-to-minimum ratio of 40:1. These values must be checked along the entire egress route, including corners, stairs, elevator lobbies, and changes in floor level. Do not assume decorative sconces can perform this role. Their beam patterns may leave a dangerous patch near a fire door. Photometric software helps, but an onsite night test remains valuable. Human eyes notice discomfort that calculations sometimes miss.
Keep emergency units visually integrated, yet clearly identifiable during failure. Coordinate their mounting height with door swings, signage, sprinklers, and maintenance access. Photometric layouts should be reviewed by a qualified lighting professional and verified against the authority having jurisdiction. Perfect uniformity is rarely achieved in a renovated hotel. That is worth acknowledging.
Choosing hotel corridor wall lighting requires more than matching a lobby fixture. The corridor operates for long hours, so energy use becomes a visible operating cost. In my project reviews, efficient LED fittings reduced relamping frequency and kept illumination stable. Pairing them with occupancy controls can save power, but sensors need careful placement. A sensor hidden behind a column creates dark patches and guest complaints. Small details matter.
Maintenance should be judged at installation, not after the first failure. Select accessible drivers, durable lenses, and finishes that tolerate luggage contact. Check it at night. Can staff replace the light without closing a long corridor section? I once favored a slim fitting that looked elegant, yet its sealed housing made servicing awkward. That assumption was wrong. A slightly larger access panel would have saved labor and reduced disruption.
Design consistency connects guest rooms, lifts, signs, and wall lighting. Use a controlled color temperature and similar beam behavior throughout each floor. Matching appearance alone is insufficient; glare near mirrors can make a corridor feel harsh. Review samples beside wall coverings, door finishes, and artwork before approving quantities. Keep spare units consistent with the installed specification, or future replacements may look noticeably different. Still, identical fixtures everywhere can flatten character. I would vary mounting rhythm, not core light quality, when the architecture allows it.
Around 100 lux is a practical baseline for circulation areas. It is not a complete design answer. Check floor visibility, room numbers, doors, and stairs on site.
Egress lighting should provide about 1 foot-candle on average. Floor-level illumination should not fall below 0.1 foot-candle. Emergency lighting should operate for at least 90 minutes during a power failure. Local requirements may differ.
Place fixtures near lifts, doors, artwork, and hallway turns. L-shaped corridors need extra attention at corners. Equal spacing alone can miss important movement points.
A 2.4-metre ceiling may suit a compact wall fixture. A 3.2-metre ceiling can leave the floor too dark. Use wall-washing optics and confirm spacing with lighting calculations.
Shield bright sources from eye level. Avoid placing every fixture directly beside a guest’s face. Check glare for standing guests, seated guests, and wheelchair users. Soft diffusers help, but they may reduce efficiency.
Sensors and dimming can reduce unnecessary energy use. Poor placement may create dark patches near columns or corners. Test response times during nighttime movement. The result may feel uneven.
Choose accessible drivers, durable lenses, and finishes that tolerate luggage contact. Staff should replace fixtures without closing a long corridor. I once chose a slim fitting that looked elegant. Servicing it was awkward.
Coordinate color temperature and beam behavior with doors, signs, lifts, and artwork. Review samples beside wall coverings and reflective surfaces. Identical fixtures everywhere may look flat. Vary the rhythm, not the basic light quality.
Choosing hotel corridor wall lighting requires a balanced approach to safety, comfort, functionality, and visual identity. Begin by defining required illumination levels, applicable safety standards, and emergency lighting needs. Then evaluate the corridor’s width, ceiling height, architectural features, and guest circulation patterns. These factors help determine the most suitable fixture placement, mounting height, beam angle, and light distribution, reducing glare while providing clear and consistent guidance.
The lighting type and color temperature should support the hotel’s atmosphere without compromising visibility. Warm or neutral light can create a welcoming environment, while carefully planned spacing helps eliminate dark areas and excessive brightness. Energy efficiency, long service life, easy maintenance, and compatibility with the overall interior design are also essential considerations. A successful hotel corridor wall lighting plan should combine dependable performance, efficient operation, straightforward upkeep, and a cohesive appearance throughout the property.